How to Stay Organized with a Baby
![]()
This is Part Two of my Life with a Baby Series! Click the link below to read Part One & Three:
My Favorite Products from Caroline’s 1st year
My System for Capturing, Organizing & Printing My Personal Family Photos
When I was pregnant with Caroline, I knew it was very important for me to stay as organized as possible with ALL of the things that come with having a baby. So, I put my love for organization to work and made a list of everything that needed a system. These systems have made my life a little easier and I’d love to share them with you!
1. Packing Lists (Baby & Toddler) – FREE printable!
I find SO much joy in creating packing lists when I travel! It keeps me very organized and ensures that I have everything I might possibly need.
When traveling with a baby, it feels like you take half of your home with you. Thankfully that decreases once they get to the toddler stage, but it still requires a lot of packing. I have created two separate packing lists, one for “Baby” and one for “Toddler”. This is what I use every time we go anywhere overnight. It’s been such a great tool to have, and I never worry about forgetting anything!
Download my FREE packing list printable here:
**Tip: If you’d like to keep the packing lists on your phone, copy the list to your Notes app! Use checkboxes so you can easily re-use your list each time!
2. Use a Cart or Changing Table for ALL of the Little Things
It’s so helpful to have all of those little things right at arms reach when you need them. This rolling cart takes up very little space and is so nice to have right next to the changing table. The cart that I use has 5 drawers & a top shelf.
Here’s a list of everything I have put/still use in the cart:
- Top Shelf – wipes, a few diapers, baby lotion & hand sanitizer. I also use the top drawer of the dresser/changing table to put the rest of the diapers, extra wipes & wash cloths.
- Drawer 1 – pacifiers, thermometer, medicines, diaper cream, hair brush/comb, tissues, nose suction bulb, nail clippers, & small toys to keep her occupied while I change her diaper/clothes
- Drawer 2 – bibs & burp cloths
- Drawer 3 – hair accessories (bows, headbands & hats)
- Drawer 4 – socks & larger sized shoes (in the back)
- Drawer 5 – shoes that she can currently wear
If you’d rather use your changing table/dresser instead of a cart, you could use storage cubes & drawer dividers inside the drawers to keep everything organized and separated.
**Unfortunately the cart that I use is no longer sold at Bed Bath & Beyond. It is sold on Amazon, but it’s a little more expensive. There are similar options available though. Ultimately, find what you think will work best for you.
.jpg)
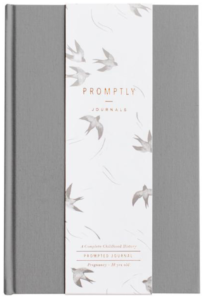
3. The Promptly Journal – a way to record all the milestones & memories
I LOVE The Promptly Journal! It starts during pregnancy and lasts until they turn 18 years old! For the first 12 months of their life, there are prompts to fill out each month for different milestones and memories that I know I’ll want to remember. After they turn 1 year old, the prompts only require me to use the journal once per year. However, knowing that she will still change a lot during these first few years, I plan to use the journal every 3-6 months for those new milestones & memories.
There are places to write letters to your child and even add photos of each stage of their life. It really takes the guess work out of making sure I remember all these different milestones throughout her childhood and will absolutely be one of my most treasured possessions as she gets older.

4. Devote One Kitchen Cabinet just for Baby
Between bottles, food, snacks, utensils, plates, bowls, and bibs, having a cabinet in the kitchen that is just for Caroline has been wonderful. I try to keep it organized as best I can. A great way to help with that is having a set of mini plastic drawers for all of the little things like utensils, lids, bottle accessories, etc. Depending on the size of your cabinet you can get a larger drawer set that could hold even more.
5. Create Closet Dividers to Separate Clothing Sizes
By the time your baby is born, you most likely have multiple sizes of clothes ranging from newborn-24 months! A great way to keep all of those sizes organized in your closet is to create closet dividers. They are very easy create and I’ve provided a step-by-step tutorial below!
.jpg)
Here’s what you’ll need:
- 10 pieces of paper card stock (craft stores like Hobby Lobby & Michael’s have lots of different colors & patterns to choose from)
- tape
- scissors
- sharpie or pen
Step 1:
Cut out 2 pieces of card stock for each divider. This will give the divider more thickness & durability. For myself, I created 7 dividers (newborn, 3 months, 6 months, 9 months, 12 months, 18 months, 24 months), so I cut out 14 pieces.
Measurements: 4 inches (width) by 5.5 inches (height)
Step 2:
Tape 2 pieces together. If you chose a patterned card stock, make sure the pattern on each side is facing outward.
Step 3:
Trace out the hole. Make sure the circle isn’t too far away from the top of your divider.
Step 4:
Cut a slit in the paper from the upper right hand corner down to your traced circle and continue cutting out the circle.
Step 5:
Write out the clothing sizes on each divider. If you chose a pattern that might be a little hard to read on, cut out a small piece of solid or lighter paper to write on and tape it to the divider on each side.


.jpg)


